
This post describes a wireless (though it needs power) interface from a dumb UK electricity meter with a flashing LED, to a Home Assistant system running elsewhere in the house. The hardware costs under £10 if you already have a USB phone charger, which most people have a surplus of these days.
Home Assistant is a home automation system that runs on pretty much anything from a Raspberry Pi upwards. It allows massively configurable monitoring and automation on all kinds of smart devices. I run it on a Banana Pi BPI-M2 Berry which is like a Raspberry Pi, but without decent support. Luckily there’s an Armbian build for it, giving a pretty much up to date Debian-ish Linux build.
I wanted to view my house electricity usage on the home assistant dashboard, but there’s no integration on a dumb meter like mine. However, the meter has a LED on the front that flashes and a little note against it saying 1000 / kWh. All I need is a light sensor, some way to transmit the data and some configuration of Home Assistant to allow me to bring in the data.
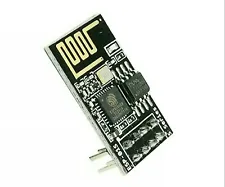
I’m quite a fan of the ESP-01 module, shown above, which can be found on ebay for ridiculously low prices. It has built in Wi-Fi and a couple of GPIO pins, which is all that’s needed for this project. A programmer for it is also only a couple of pounds, and plugs into the USB of a PC, allowing you to use the Arduino IDE to program it.
The light detector I had lying around was a Light Dependent Resistor, but I have no details on it. It seemed to have a resistance of about 2M Ohms in darkness and about 2k Ohms in bright light. Using this as one half of a potential divider allows a pin of the ESP-01 to be pulled high when the sensor is dark and pulled down low when the LED lights up the sensor.
The ESP-01 module needs a 3.3V power supply, which is a bit annoying as I have loads of 5V USB supplies lying around. So, looking a bit further on ebay, I found a very cheap DS18B20 interface board for it that contains a temperature sensor and a 3.3V regulator to provide the ESP board with the voltage it needs.
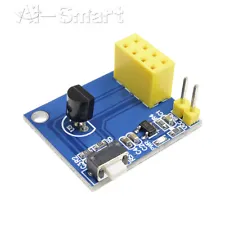
I didn’t need the temperature sensor, so cut it off, leaving tiny PCB with a socket for my ESP-01 and the voltage regulation it needs. I should have thought a bit longer about this and left the sensor in place as there are other GPIP pins I could have used and I would have been able to also send the temperature. The pin that the temperature sensor was wired to has a fairly low value pull up resistor so I ended up cutting the track to that. It’s the track that runs from the middle pin of the sensor to one of the resistors near the reset button. For the light detector to work I needed a 270k Ohm pullup resistor between the input pin and the 3.3V supply, with the LDR connected on a long wire from the input pin to ground on the PCB. The LDR is taped to the front of the meter with black PVC tape to try and block out any stray light that could cause false triggers.
Now I just need some software.
Home Assistant can use webhooks to gather data and the ESP-01 has built in Wi-Fi with all the required libraries easily available. The first step is to create the configuration in Home Assistant. This is done by adding the following block to the configuration.yaml file, which I found in the .homeassistant folder of the homeassistant user on my Pi.
template:
  - trigger:
      - platform: webhook
        webhook_id: electric-meter-webhook
    sensor:
      - name: "Electric Usage"
        state: "{{ trigger.json.electricusage }}"
        unit_of_measurement: W
This tells Home Assistant that it has a new sensor called Electric Usage and the data will be fed to it by a webhook called electric-meter-webhook. I don’t know why I bothered to put webhook on the end, it’s pretty obvious that’s what it is. The data will be contained in the electricusage field of a json payload sent to the webhook. You need to re-start Home Assistant after editing this file, but there’s a nice yaml checking function to use before you do.
I can test the above webhook by sending data from a linux machine to it with this command
curl -H "Content-Type: application/json" -X POST -d '{"electricusage":8.2}' http://HOME_ASSISTANT_IP:8123/api/webhook/electric-meter-webhookDoing this and interrogating the sensors showed a new one had appeared called Electric Usage and was saying that I was using 8.2 W.
The next step is to program the ESP-01 in the Arduino IDE, The code’s a bit rough and ready, but it works.
#include<ESP8266WiFi.h>
#include <Ethernet.h>

const char* ssid = "MY_WIFI_NAME";
const char* password = "MY_WIFI_PASSWORD";
const int sensor = 2;
const int LED = 1;

// The input pin is pulled low when LED flashes.
int lastState = true;
unsigned long lastTime = 99999999;
WiFiClient client;

void setup()
{
  pinMode(LED,OUTPUT);
  pinMode(sensor, INPUT);

  WiFi.begin(ssid, password);
  while (WiFi.status() != WL_CONNECTED)
  {
    digitalWrite(LED, HIGH);
    delay(250);
    digitalWrite(LED, LOW);
    delay(250);
  }
}

void loop()
{
  int pinState = digitalRead(sensor);
  if (!pinState && lastState)
  {
    unsigned long timeNow = millis();
    unsigned long timeDelta = timeNow - lastTime;

    // probably wrapped the counter, ignore this reading.
    if (timeDelta > 180000)
    {
      lastTime = timeNow;
      lastState = pinState;
      return;
    }

    // sometmes there's a bit of oscillation when turning off
    if (timeDelta < 400)
    {
      lastState = pinState;
      return;
    }

    digitalWrite(LED, LOW);
    float watts = 3600000 / timeDelta;

    String postData = "{\"electricusage\":" + String(watts) + "}";
    IPAddress server(HOME_ASSISTANT_IP_WITH_COMMAS_INSTEAD_OF_DOTS);
    if (client.connect(server, 8123))
    {
      client.println("POST /api/webhook/electric-meter-webhook HTTP/1.1");
      client.println("Host: HOME_ASSISTANT_IP");
      client.println("User-Agent: Arduino/1.0");
      client.println("Connection: close");
      client.println("Content-Type: application/json");
      client.print("Content-Length: ");
      client.println(postData.length());
      client.println();
      client.println(postData);
    }

    lastTime = timeNow;
    digitalWrite(LED, HIGH);
  }
  lastState = pinState;
}
The ESP-01 has a blue LED on it, the code above flashes the LED while trying to connect to the WiFi and again whenever sending data to the webhook. The setup function is called once by the Arduino framework. It starts WiFi and configures the GPIO pins. The loop function is called repeatedly and does most of the work, such as…
– Detect when the pin goes from high to low.
– Calculate the time between pulses.
– Sanity check the result and discard false tiggers.
– Calculate the watts used by dividing 1 hour by the time between flashes.
– Create the JSON payload.
– Send the payload to the webhook.
Here’s a snapshot of the result. Not much is happening that I can identify in the last hour but some things do stand out when they happen. The electric oven uses 2.5kW for a while, then settles into an on/off cycle as it gets up to temperature. The kettle uses 3kW, but thankfully it’s never on for long. The washing machine and dishwasher both use a lot as they heat up, then settle back down.

Possible enhancements.
The hardware is fine, though I should have left the temperature sensor on and used a different GPIO pin. The software, however, could be improved a bit. At the moment, it sends the power usage for every Watt Hour used. That’s fine when nothing’s on, but when the kettle is on, it’s sending updates pretty much every second. I’d like to only send updates once a minute, and send the average power over the time period. Another possible enhancement is the trigger detection. There’s a lot of electrical noise on the signal and I’ve seen the occasional spurious value, which I believe is from this noise. One way around this would be to only trigger on reading several low levels in a row.
Conclusion.
Home Assistant is great. It’s allowed me to integrate the 433MHz controlled light switches around my house with Google Home. I can use it to monitor all kinds of data and haven’t really scratched the surface of the automation side yet.
The Banana Pi BPI-M2 Berry is great. It’s like a Raspberry Pi, but not out of stock everywhere, and it has a SATA port so it can be used as a NAS.
ESP-01 modules are great. They’re small, cheap, low power, WiFi enabled and easy to program. There’s a bigger, better version called the ESP-12 too which gives more access to the IO pins on the CPU, allowing things like ultra-low-power sleep mode and analog input.