
A few days ago I created a project in Scratch on a Raspberry Pi 3. The plan was to mount an ultrasonic distance sensor on a stepper motor and have it scan the room drawing a picture of the room as it went. In this part, I’ll talk about the stepper motor and how it’s controlled.
First comes the stepper motor hardware, Just stick these part numbers into eBay to see what I’m talking about. I used a 28BYJ-48 motor with a ULN2003 driver board. This meant I didn’t need a separate power supply and the Pi could easily drive the control signals. This motor takes 4096 steps for a complete revolution, which is a bit slow, but good enough. The output shaft is the right size to stick into a Lego hole.
The motor contains 4 sets of electro-magnets that can be switched on and off by the Pi. These magnets pull a permanent magnet to the position of the nearest activated coil. To make the motor turn, activate one coil at a time in sequence. Once you’ve done all 4, the motor will have turned a tiny fraction so repeat it over and over to actually see something happen. The driver board has helpful LEDs so you can see the software is activating the coils in the correct sequence.
To drive the motor you need to connect a 5V supply line, a ground signal and 4 GPIO lines to the controller. I have a stock of 10cm Female to Female jumper wires that are ideal for this. Again, look on eBay for them.
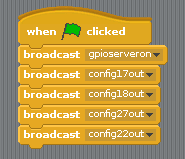
I used Scratch 1.4 as I didn’t realise version 2 had been released a few days earlier. A small code block was created and attached to a when green flag pressed. This turns on the GPIO and sets the 4 GPIO pins we’re using to outputs.
A second code block was attached to an event receiver. This block turned the first coil on, waited a small time, then turned it off. It then did the same for the other three coils in sequence. As the steps on the motor are so small, this gives less than one degree of rotation each time it is called.

A global variable called angle remembers the current stepper position, but that’s not important right now, only the broadcasts and delays really matter.
That was driven by the following code block hooked up to a sprite of a roughly drawn arrow.

Using the mouse down instead of click events means you can just hold the button down to see the motor turn slowly around.
There’s another almost identical code block and another icon calling it by another event. The difference is that these ones step the motor the other way by reversing the order the coils are activated.
That’s all for now, I’ll put details of the sensor up soon.
A very good writeup with many such good information i enjoyed the opportunity to read your blog. Looking forward to learning more from your website. https://www.youtube.com/watch?v=pZWd96Zhx_w
I got this web site from my buddy who told me concerning this web page and
at the moment this time I am browsing this website and reading very informative content
at this place.
This helps. Thanks!
HI, this really great and works well, is there any way of speeding up the motor as it is too slow for our needs? we have changed theangle and reduced the wait time to 0 but it is still quite slow?
Sorry for the delay here, I really should take a look at the comments more than once a year.
Unfortunately, Scratch is a slow language. Couple that with the motor I used being geared to be even slower and it’s always going to crawl. So, you could either use a different stepper (if you are using the same one as me) or use a different language. On another project on the Pi, I used a GPIO line controlled by scratch to signal some other code written in C. It’s a nasty hack, but would allow you to signal the stepper to move in batches of steps. If using C, or most languages really) you’ll have to delay the steps for the motor to keep up.